TaskQueues
Personal research about task queues and how to use it in videogames: https://yulna.github.io/TaskQueues/
Project maintained by Yulna Hosted on GitHub Pages — Theme by mattgraham
Task queues and managament oriented to videogames
To start talking about task managment first we must define what is a task. Tasks can be defined as an encapsulation of a function inside an object.
To clarify this part, what i’m trying to say is that when using tasks we want to transform our functions or methods into classes so we will be able to use object operators with them. This might be a little confusing so take a look at the example below to understand it better, what we want to do is call the function we encapsulated in the Execute() method, so we have an access to the function and also we can treat is as an object.
class InputTask
{
public:
	InputTask() {};
	~InputTask() {};

	virtual void Execute() {};
};
The fact of encapsulating the function and all the variables it need to be performed it’s known as Command pattern, and is incredibly useful, at least to me, when dealing whit users inputs or AI in videogames. In the notes below I will try to show you how I personally have used them in my projects, it may not be the best way of doing it nut I hope at least it serves a guide on how to use the command pattern.
Also a visual studio project is provided to do the exercices at the end of the page, those exercices are related to the command patter and might help you understand it, an exe file + another visual studio project with the solution are also provided.
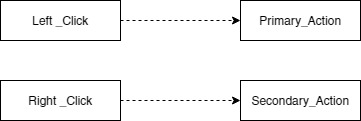
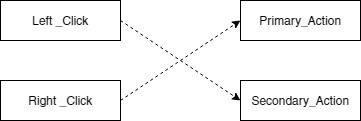
The objective of doing those exercice is to make the program able to move the 2 characters than appear with mouse clicks, the left click should move one of them and the right click should move the other, the porgram should also be able to swap the keybindings when pressing [Q].
Input via Command pattern
In any game we need to read the user input and turn it to some meaningful action on our game. One of the simplest ways of doing so is to call a function when the key is pressed.
This type of input reading works but presents one major problem, the keys are binded to what the programer decides in the code and the only way of changing them is directly changing the code. So if we want to produce some program that allows the user to change the key bindings we need to use some other kind of method that allows us to freely swap those function calls, something easily done if we use objects, to do so as you probably have guessed we will turn our functions into objects using tasks.
First we must define the functions we want to active as objects, to do so we will start by creating a base class to represent an input command.
From that base class we will create different subclasses for each command we need to take, and call its functionality inside the Execute() method.
Now we can create and store pointers to the base class so we can operate with this functions as objects by calling them via “task_pointer->Execute” and easily exchange them.
Command patterns on AI
The main idea in using the command pattern on AI is to create different tasks to encapsulate the AI functions, and then create some class or method to act as a brain for the AI that can store the different tasks that the AI has to do and manage those tasks so they execute in the correct order.
So, how we do that? Well, first we have to start the same way we started when we were working with the inputs, creating a basic task class for all the AI functions, we will call it Action since it is the name used in the example code.
//Action virtual class
class Action
{
public:

	//Set all the Actions to a list on the Entities manager to clean them up at closing the app.
	Action(Entity* actor);
	~Action();

protected:
	//Since this class Action will be used purely for the AI on entities
	//we store a pointer to the entity in the base class
	Entity*					actor = nullptr;

public:
	//Returns false if the Action couldn't be activated
	virtual bool Activation() { return true; }

	//See that this time the Execute() returns a bool to allow us to know
	//if the action is in progress or it has ended
	///Returns TRUE when the action finishes
	virtual bool Execute()	{ return true; }

};
We can see that the base Action class is quite similar to the base Task we talk about earlier, i has is constructor and destructor and its execute, but this one has some extra methods and properties, so let’s take a moment to see why they are here.
First we see that the Execute() method returns a bool value not void, we have it this way since most of the Actions will take more than one game loop to complete,take for example the Action move, if we want to move we will slowly go from point A to point B and it will do the action through multiple game loops, so we need some way of knowing when the Actions ends and when it’s still going on, and having it return a bool is the simplest way to do so.
We also see an Activation() method, this is completely new and the reason why it is here is to have a method to set value all the variables that we need to do the Action since the time when the Action starts is not always the same time we create the Action, and we want to use the Action in the current game state, not the one we had 5 minute ago. It also returns a bool value to indicate if the Action has been successfully activated.
We also have the actor property which is a pointer to Entity (Entity refers to characters, buildings or anything we create in the game), we know that the Action class will be used to handle the AI that each entity has independant to the others, so I like to put this property here to make sure each Action “knows” which entity is it working with, also we will usually call methods of the entity itself on the execute so having it in the base class means that we don’t have to worry on storing the actor when creating other actions.
Now that we have the Action class defined we can start working on the “brain” that will store and manage those Actions, or as I like to call it the worker.
Let’s start by looking at the properties the action worker should have, as we see here we need some class to use as a storage, in this case we use a list but it could be any other kind of class that allows us to store multiple objects in it as a vector, queue, etc… Also we need a pointer to Action for the current action that will be taking place each game loop.
class ActionWorker
{
public:

	ActionWorker();
	~ActionWorker();

private:

	std::list<Action*> action_queue;
	Action* current_action = nullptr;
    .
    .
    .
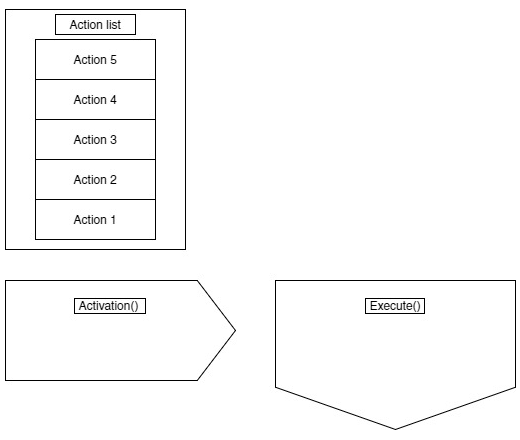
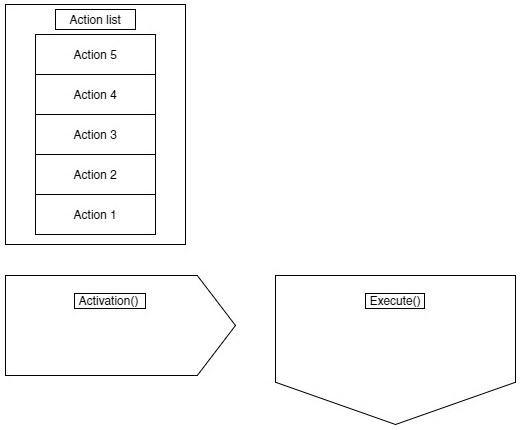
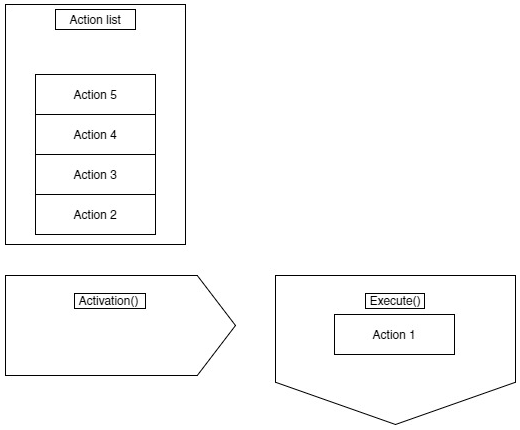
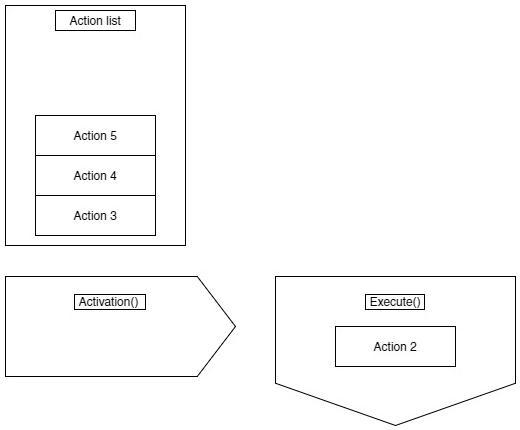
Now let’s analyse what methods the worker has to manage those Actions, looking at the provided code we see 3 methods Update(), AddAction() and Reset().
    .
    .
    .
    public:
	//Updates every list
	void Update();

	void AddAction(Action* action);

	//Clean all actionss of the worker
	void Reset();
Let’s start by explaining what the lastest 2 do, since they are the simplest ones, AddAction() method simply pushes the action it takes as argument to the worker list, Reset() frees all Actions that the worker has on the list and the current action. The Update() method is more complex, this Update() will be called each game loop and it will manage all the Actions the worker has, here is the flow that I used in the code provided. The .zip file with the code includes a .jpg of the diagram below for a better view.
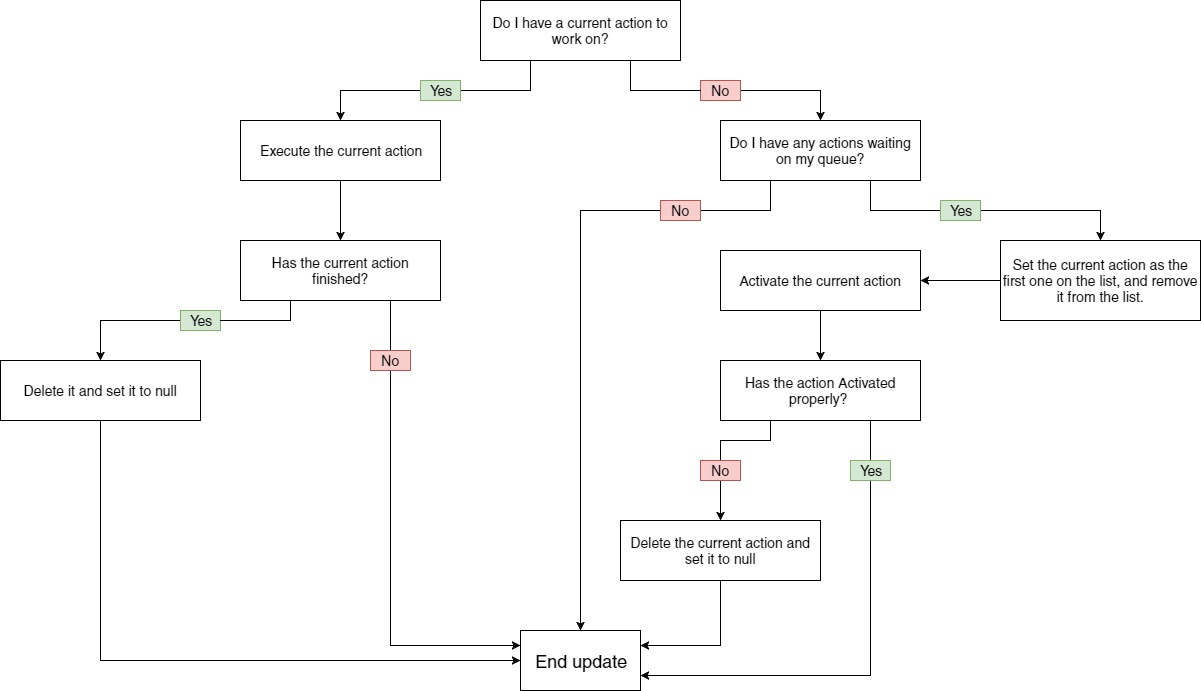
When the worker logic is done it should act more or less like this representation:
Input exercices
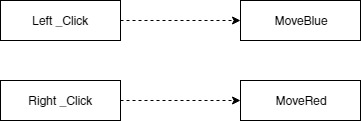
For the input part there is only 2 small exercises to gain some confidence when dealing with tasks, the objective here is to understand how tasks works and how to replace functions with task, so you should look at the j1Player.h file to see the base task named as InputTask and his 2 childs MoveBlue and MoveRed. Player also has 2 pointers to the base class, during the player Start() you can see that left_click is assigned to a MoveBlue task and the right_click is assigned to the MoveRed task.
At the end of this parts you should have a code that prints “Moving red…” or “Moving blue…” in the visual output console depending on which mouse key you pressed, and the user should be able to swap those functions pressing [Q].
bool j1Player::Start()
{
	left_click = new MoveBlue;
	right_click = new MoveRed;

	return true;
}
TODO 1:
In the first todo you should execute the tasks assigned to the right mouse click and the left mouse click. You only need to call the Execute() method for each task pointer you have.
If you have done it right you should see the commands “Moving red…” and “Moving blue…” on the output window from visual studio each time you press the right or left mouse buttons. The actual move will be done later on the AI part.
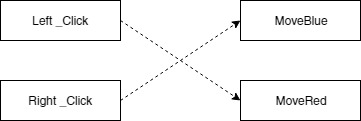
TODO 2:
In this exercise you only have to do a simple data swap between the two task pointers, if you have done it right each time you press [Q] the text printed in the output window when clicking should be reversed, for example since we have assigned the MoveBlue to the left_click pointer when we click with the mouse left button the text printed is “Moving blue…” but when we press [Q] the text printed should be “Moving red…”
Basically we have to do this:
AI exercices
Before starting the AI exercice make sure you understand the basic concept behind tasks, since all the work done here will exploit them. As stated in the text above we will refer to the AI specific tasks as Actions.
At the end of this part the blue and red characters should move where at the mouse cursor depending on which input the user presses, and the user should be able to make a predefined path and the the unit will follow it.
In the TODO’s 3 and 4 we will complete the MoveUnitAction so it can receive a iPoint as destination and move according to a path.
TODO 3:
As we talked before the AI uses a new method called Activation(), in this exercise you should fill the activation method for the MoveUnitAction. To activate this move we must store a vector of iPoints on our path property.
You can obtain a path by calling App->pathfinding->SimpleAstar(…)
TODO 4:
Just a brief exercise to remember that the main functionality of the Action will be done in the Execute(). You need to call the Move(…) method from the Unit* actor and return true or false depending if the movement has ended or not, the Move(…) method from the actor already returns true when the path ends.
Note: Remember that actor is used as a pointer to Entity so you must cast it to (Unit*)
During the TODO’s 5,6,7 and 8 we will work with the action worker and see how it manages the Actions, is highly recommended that you look at the ActionWorker declaration to understand with what are you working.
TODO 5:
This is also a simple todo, we just have to add the action we receive to the Action* list that the worker has.
TODO 6:
For this TODO is highly recommended that you use the actionworker_flow.jpg as guide for a better understanding.
In this TODO we must check if the worker has or not some Action in the list waiting to be done (see that it has already checked if we are doing an action or not right now). If we find that one or more Actions are waiting in the list we will pass the data of the first action to the current_action pointer and remove the first action from the list. As a second step we shall check if the Action has activated correctly and if it is not the case delete it and set the current_action to null.
TODO 7:
For this TODO is highly recommended that you use the actionworker_flow.jpg as guide for a better understanding.
Here we will have to make the code that Executes the current_action that is taking place, note that we have already checked if we have a current_action. This time it will not be as simple as when we did the Input part since here we have to check if the action has been completed and delete it when it happens.
TODO 8:
Here we will free the worker from all actions, it is important to do so since if we didn’t do it we will have to wait until the unit has ended our first command before actually doing the next one.
TODO 9:
Just uncomment the code, the lines commented will use the functions that we created during the AI part and give to the blue and red units the Actions for them to move.
Multithread suggestion
You can try to do the functionality of the worker Update() and Reset() in a separate method that receives a list of actions and a pointer to an action, with that you can simplify your update just by calling this new method and passing the actions list and current action you want in just one line.
If you set it up this way it is possible to make a multithread worker by adding more pointers to action, one for each thread of work you like to have, you can even add diferent lists so each list contains a concrete type of action and update them depending on each other.
For example if you want to make some unit autoatack in a videogame you could add a diferent action list that for passive action and another list for active actions, then you could use the active list to send actions such as move or attack that the player sends, and the passive list for actions such as autoattack that take place when the player isn’t sending any command. If you have set it this way you could check if the worker is executing any actions from the active list and if it isn’t execute the actions on the passive list.
If you wish to experiment in the multithread worker I have left the separate methods and how to call them in the Solution folder of this repository if you need help in passing the Update() and Reset() functionallity to diferent methods.
Credits
Thanks to the DemonRealm team for letting me use an adaptation of their game for the exercices.
This software was made using SDL libraries.
This software is based on pugixml library. pugixml is Copyright (C) 2006-2015 Arseny Kapoulkine.
Virtual file system was made using Physfs library.
Sources & Additional information
http://gameprogrammingpatterns.com/command.html (A very good and complete guide on how to use the Command pattern focused on input implementation)
https://www.youtube.com/watch?v=22n06z0rq4c (Personally at my current level I didn’t understand quite well most of the concepts on this video, but it gives interesting information than can be applied to our task management worker)